|
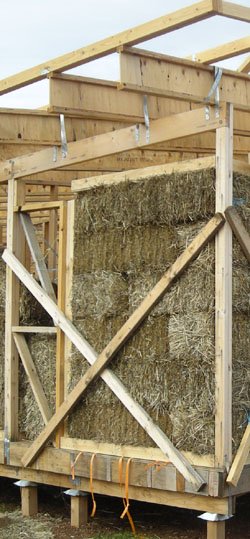
Straw Bale House ConstructionWorking with BalesThis past weekend I had my first experience at straw bale house construction, and despite having a rather sore body, the day after, it is a 'good sore' (if there is such a thing!) after an honest days work throwing around straw bales for 8 hours! The site I helped out on is outside of Melbourne, and belongs to Peter and Natasha, who's journey you can follow
here on their Strawbale Blog,
as well as being able to see pictures of the great group of people I was working with. 
After writing and dreaming about community architecture, many years ago as a naive architectural student, it was a joy to actually be involved in the real thing, and get a sense of a willing and happy group of like-minded individuals all working together. Even though we were without the vital strawbale construction tool, the 'baling needle', due to a mix up, we managed to fashion our own, and succesfully split bales, notch bales and fit them snuggly into place using only very basic tools. Straw is an easy material to work with, apart from being a bit 'scratchy', and any bales that you notch or split incorrectly can always be used as 'biscuits'- little 'slices' of straw used to fill tiny gaps. The walls still need to be braced, aligned with the mallet, trimmed and have some compression applied (generally with a top plate) before rendering. All in all it was a great day, the weather was smiling upon us, the super-mums did a great job with catering for the hard-working crew and hopefully next week I can get back and learn some more straw bale skills!
Next installment on the straw bale house...here
|
Going Solar?
Want to Save Water?
Straw bale - Passive Solar Design
Thinking of Investing Green?


 Tip for working with straw bales- wear gloves, preferably thin well fitting ones, that protect your skin from the straw and twine, but still enable your fingers to be nimble enough to handle sharp tools and tie off lots of twine (really tight) to keep your bales firm.